!doctype>
Εμφάνιση αναρτήσεων με ετικέτα Programming. Εμφάνιση όλων των αναρτήσεων
AngularJS - The ng-class directive
The ng-class directive allows the dynamic setting of CSS classes on an HTML element
And the results are:
AngularJS - The ng-disabled directive
The ng-disabled directive can disable or enable a visual element based on a Boolean value of an expression.
And you can see the results bellow
(see AngularJs Simple Program for the whole program )
And you can see the results bellow
(see AngularJs Simple Program for the whole program )
AngularJS - The ng-click directive
The ng-click directive allow us to specify custom behavior to the click event of the element.
(see AngularJs Simple Program for the whole program )
AngularJS -The ng-model directive
The ng-model directive binds an input, select, textarea or other custom control to a property.
In the above case (see AngularJs Simple Program for the whole program ) the object that is being formed is an item (from supermarket list). So I have used the item.kind expression inside the directive.
AngularJS - The ng-repeat directive
The ng-repeat directive is useful to iterate over arrays and objects. In general it can be used across any kind of objects such as rows, lists etc which are a collection of data.
In first AngularJs Simple Program I have used this directive to present the data which are stored into the array.
and the results are presented bellow
The ng-repeat directive accompanied also from some useful properties:
In first AngularJs Simple Program I have used this directive to present the data which are stored into the array.
and the results are presented bellow
The ng-repeat directive accompanied also from some useful properties:
- $index - Number - This is the physical number of the element into the object
- $first - Boolean - If this is the first element then return True otherwise False
- $last - Boolean - If this is the last element then return True otherwise False
- $middle - Boolean - If this is the middle element then return True otherwise False
- $even - Boolean - If this is even element then return True otherwise False
- $odd - Boolean - If this is odd element then return True otherwise False
And the reuslts are:
AngularJS - The ng-Bind directive
The ng-bind directive is used for updating the content of an element with the results of the provided expression. With other words has the same functionality as double curly markup i.e. {{item.kind}}
The benefit of ng-bind versus the double curly markup regards the better presentantion on screen This is because the page is being compiled, there is a time slot before the state of the expression is shown. If the directive is formed by double curly markup, that (double curly) will be visible for a while.
In the above example, I have defined the variable myTitle into controller on $scope object.
And into body section I have used the content of my variable calling the directive ng-bind
The next screenshots shows the results
AngularJS - The ng-controller directive
In AngularJs Simple Program, I have used a controller called writeAListCtrl. A controller has about a javascript function syntax and logic, and contains the exact description of the desired functionality.
We can attach any controller to the view using the ng-controller directive.
While you are using this directive, the controller and the view start to share the same scope and can work together.
AngularJS - The ng-app directive
A directive is an extension of HTML language, which allows to define new behaviors compared with the pure HTML.
In general every piece of code has the prefix ng- is an AngularJS derecive.
AngularJS comes with a set of directives and each one them has its own behavior.
The first directive we met in first AngularJs Simple Program was the ng-app. This derective is very useful, because in such way, we define to the system, that we will use the AngularJS framework. It is possible to used with or without a parameter and can be placed enen in html tag or body tag
It is needed to note here that we can define just one ng-app directive in the same HTML document.
AngularJS simple program
After we have opened a project having added AngularJS scripts, its time to Add a new HTML page.
In the new form just give the name of the html page and press OK
A new form will open having some html code
In the html tag add the bellow (in red circle) code. The ng-app piece of code gives to engine to undertand that we will use anjularJS
The bellow AngularJS code is a very simple program which create a List for the supermarket.
A directive is an extension of HTML language, which allows us to define new behaviors.
In general every piece of code has the prefix ng- is an AngularJS derecive.
The ng-controller derictive is placed in order to bind the writeAListCtrl controller to the view.
The ng-repeat deractive is used to iterates the Items array
The {{item.kind}} used to display the kind of each item
In the new form just give the name of the html page and press OK
A new form will open having some html code
In the html tag add the bellow (in red circle) code. The ng-app piece of code gives to engine to undertand that we will use anjularJS
The bellow AngularJS code is a very simple program which create a List for the supermarket.
A directive is an extension of HTML language, which allows us to define new behaviors.
In general every piece of code has the prefix ng- is an AngularJS derecive.
The ng-controller derictive is placed in order to bind the writeAListCtrl controller to the view.
The ng-repeat deractive is used to iterates the Items array
The {{item.kind}} used to display the kind of each item
The result of the code there is the bellow screenshot
How to use AngularJS with Visual Studio Express 2015 for Web
In my opinion the most convinient way to write a web application with AngularJS, is to download from microsoft's web site (https://www.visualstudio.com/en-us/products/visual-studio-express-vs.aspx) the Visual Studio Express for Web
After you have completed the installation, start regularly the Visual Studio for Web
And just create a new project
In the next form declare your prefer language (I prefer C#) and give the project name and the location in which your project should be stored.
After you have completed push the OK button
From the next form chose Empty project and press OK
After few moment your project will be ready
Now you should add the AngularJS scripts.
Place your cursor to solution explorer window and on the project name press the right click
From the next form chose to browse everything about AnjularJS
Select the AngularJS Core and finally press install button
If everything goes well, the scipts would have been added into your project
Creating a Web Form with some basic content using ASP.NET in C# - Lesson 2
Start Visual Studio 2010
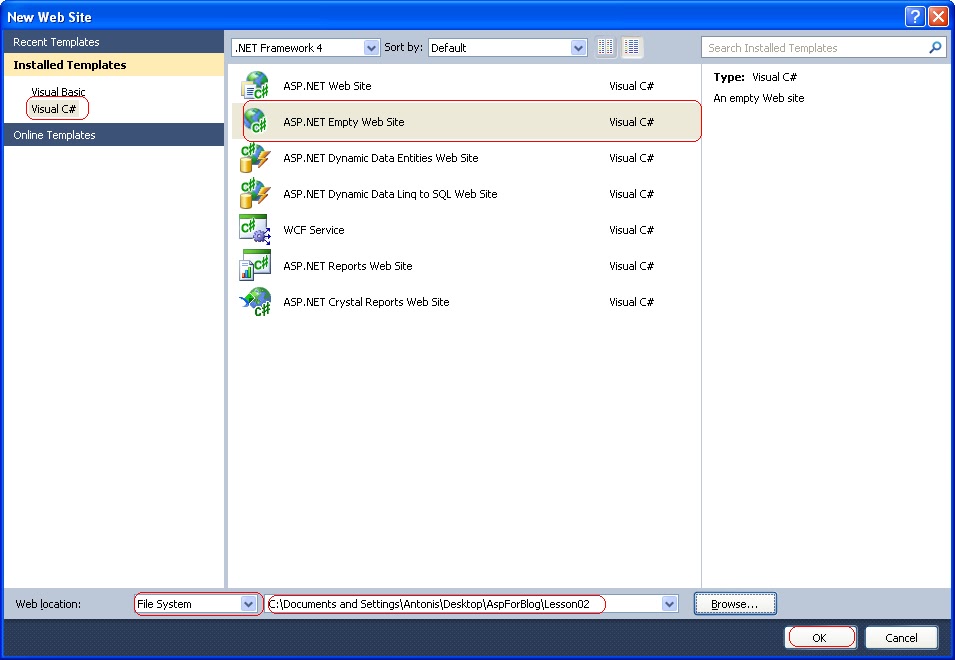
On the main menu choose File, New, Web Site
In the dialog which is appeared make the selections that is mentioned in red rectangles schemas bellow
On the solution explorer window, press right click on C:\...\Lesson02\ element. A new menu appeared. On this menu choose New Item.
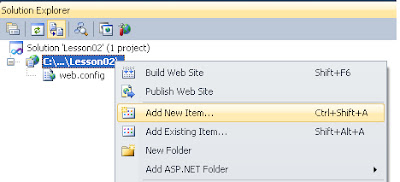
A new window is appeared. Choose the selection Web Form and you should give a name for it. In this example I am giving the name myForm.aspx. When you are ready press Add Button.
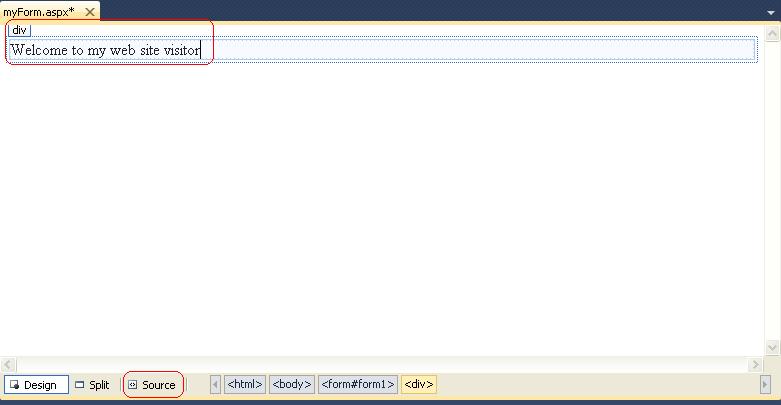
This action creates a new form in our project and a new window like this bellow is appeared. At the left and down corner there are three different choices: Design, Spit and Source. While you press any of this buttons the view will be changed. The Design button is helping to previewing the form. The Source button is giving access to code and the Spilt button is helping us to have access on both previous views
So, press the Design button to switch to the Design view
Click inside the dashed area until you see the label div instead the label body
Type Welcome to my web site visitor and then press the button Source
In the new view locate the sentence you just have typed and add the tags
In the new view you can see the reaction of the tag
Position the cursor at the end of the sentence you have wrote and press the Enter form your keyboard.
A new paragraph is inserted indicated by the symblol p
Type the text sown in the below picture. Have in mind that when you press Enter form your keybord you can start a new parapraph.
We can also make a lot of formats on our text, such as to change the foreground color, or make some text bold or Italics, or we can also change the color of the backgroud. It's up to us.
Now press the button Source. The code should look more or less similar to the code in picture below
Press Ctrl + F5 to execute the project into your browser.
Type into textbox area your message and then press the button.
Good luck.....
Antonis
On the main menu choose File, New, Web Site
In the dialog which is appeared make the selections that is mentioned in red rectangles schemas bellow
On the solution explorer window, press right click on C:\...\Lesson02\ element. A new menu appeared. On this menu choose New Item.

A new window is appeared. Choose the selection Web Form and you should give a name for it. In this example I am giving the name myForm.aspx. When you are ready press Add Button.
This action creates a new form in our project and a new window like this bellow is appeared. At the left and down corner there are three different choices: Design, Spit and Source. While you press any of this buttons the view will be changed. The Design button is helping to previewing the form. The Source button is giving access to code and the Spilt button is helping us to have access on both previous views
So, press the Design button to switch to the Design view
Click inside the dashed area until you see the label div instead the label body
Type Welcome to my web site visitor and then press the button Source
In the new view locate the sentence you just have typed and add the tags
before the sentence and
after. Then press the button Design... (which means heading)
Position the cursor at the end of the sentence you have wrote and press the Enter form your keyboard.
A new paragraph is inserted indicated by the symblol p
Type the text sown in the below picture. Have in mind that when you press Enter form your keybord you can start a new parapraph.
We can also make a lot of formats on our text, such as to change the foreground color, or make some text bold or Italics, or we can also change the color of the backgroud. It's up to us.
Now press the button Source. The code should look more or less similar to the code in picture below
Press Ctrl + F5 to execute the project into your browser.
Type into textbox area your message and then press the button.
Good luck.....
Antonis
Creating a very first ASP.NET Web Page - Lesson 1
On the File Menu Choose File, New,Web Site
In the dialog which is appeared make the selections that is mentioned in red rectangles schemas bellow
On the solution explorer window, press right click on C:\...\Lesson01\ element. A new menu appeared. On this menu choose New Item.
A new window is appeared. Choose the selection Web Form and you should give a name for it. In this example I am giving the name myForm.aspx. When you are ready press Add Button.
This action creates a new form in our project and a new window like this bellow is appeared. At the left and down corner there are three different choices: Design, Spit and Source. While you press any of this buttons the view will be changed. The Design button is helping to previewing the form. The Source button is giving access to code and the Spilt button is helping us to have access on both previous views
So, press the Design button to switch to the Design view
We will use the Toolbox palette. On the main menu we choose View and then the Toolbox selection

So, press the Design button to switch to the Design view
We will use the Toolbox palette. On the main menu we choose View and then the Toolbox selection
The Toolbox palette is open right now. On the Standard section we are trying to locate the TextBox mechanism. Then drag and drop the mechanism into the area which are colored on red

Repeat the previous actions choosing now the Button mechanism
The Design view now should looks similar to below picture
Now press right click on Button and the choose Properties
A new window named Properties will be appeared. Locate the Text property and replace the content with the text Click When Ready.
This action will change the label of the button
On the Toolbox palette locate the Label mechanism and drag and drop it into the dashed area. You can also expand this area by pressing the Enter button from your keyboard. So your view might seem like the picture below.
Now Double click somewhere in the white area below the dashed area. This will transfer us from Design view into the Code behind of the file.
Place the lines of code which are marked into red rectangles on the below picture.
Press Ctrl + F5 to execute the project into your browser.
Type into textbox area your message and then press the button.
Good luck.....
Antonis
Εγγραφή σε:
Αναρτήσεις (Atom)